With QuillBooking, you can define availability for yourself or your team, allowing attendees to book time slots that work for everyone. In QuillBooking, you can create hosts—each with their own calendar—for streamlined meeting management. This guide walks you through the simple steps to create a new host.
Creating a Host in QuillBooking
To get started:
Click on Calendars from the side navigation menu.
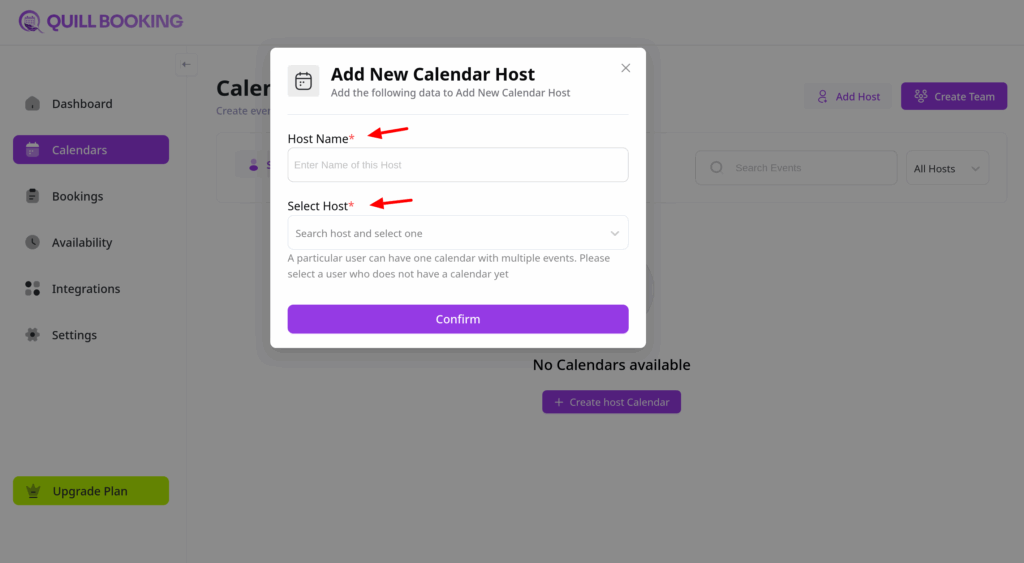
Click the “Add Host” button or the “Create Host Calendar” button
Select a Host
A pop-up window will appear where you can choose a host. QuillBooking will display a list of users from your WordPress site. Simply click the name of the user you want to assign as the host.
The Collective Booking feature lets you assign multiple hosts to a single meeting with one client or attendee. Unlike traditional one-on-one meetings, this setup is perfect for sales calls, panel interviews, support sessions, or any meeting that requires a collaborative team approach.
In this guide, we’ll walk you through the process of creating a Collective Booking in QuillBooking
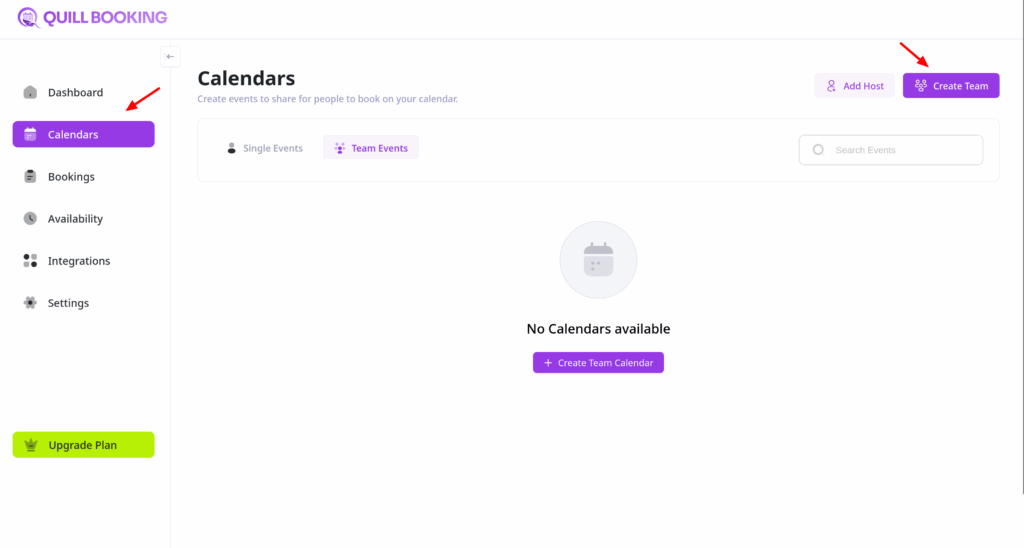
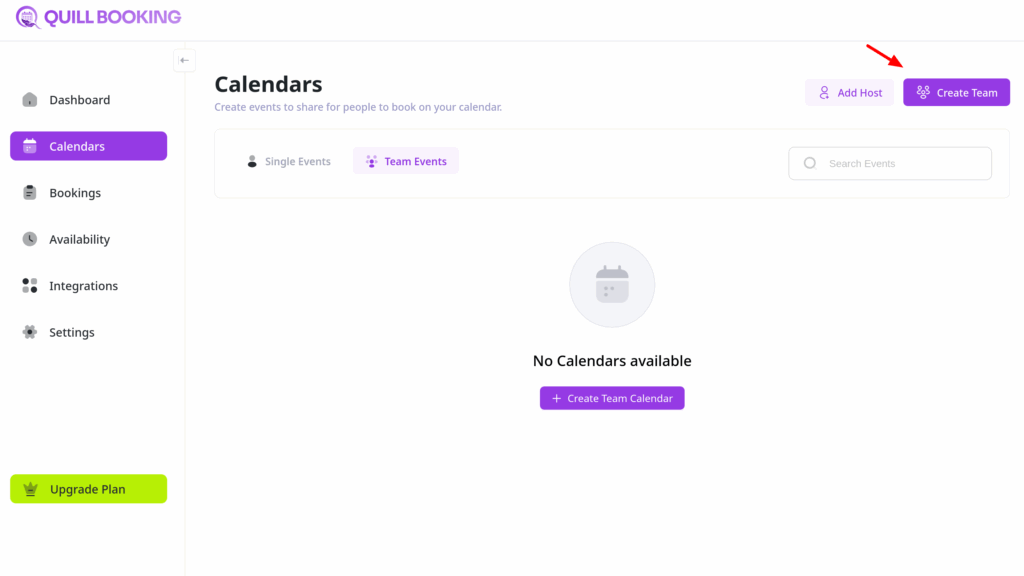
Step 1: Start a New Team Event
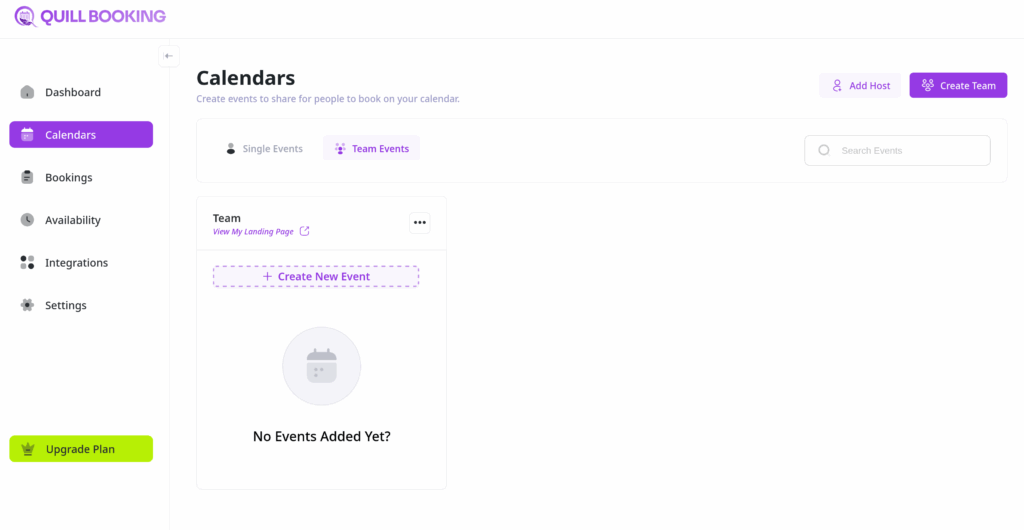
From your QuillBooking navigation menu, go to Calendars.
Click the Create Team button.
⚠️ Note: The Collective Booking feature is only available for Team Events.
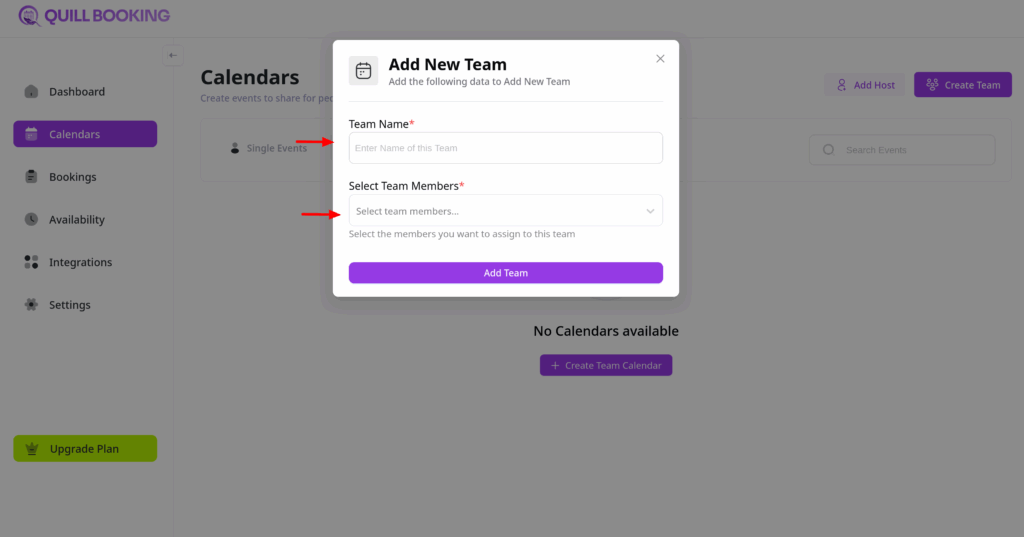
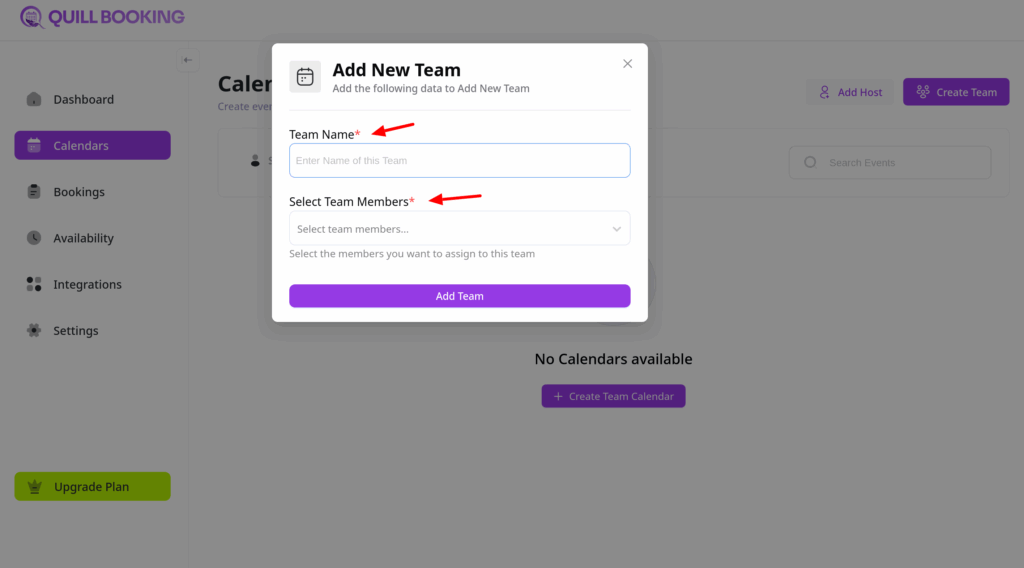
Step 2: Create and Configure Your Team
Give your team a name.
Use the Select Team Member dropdown to add team members.
Click on Add Team button
Once you click on Add Team button, a calendar will be created.
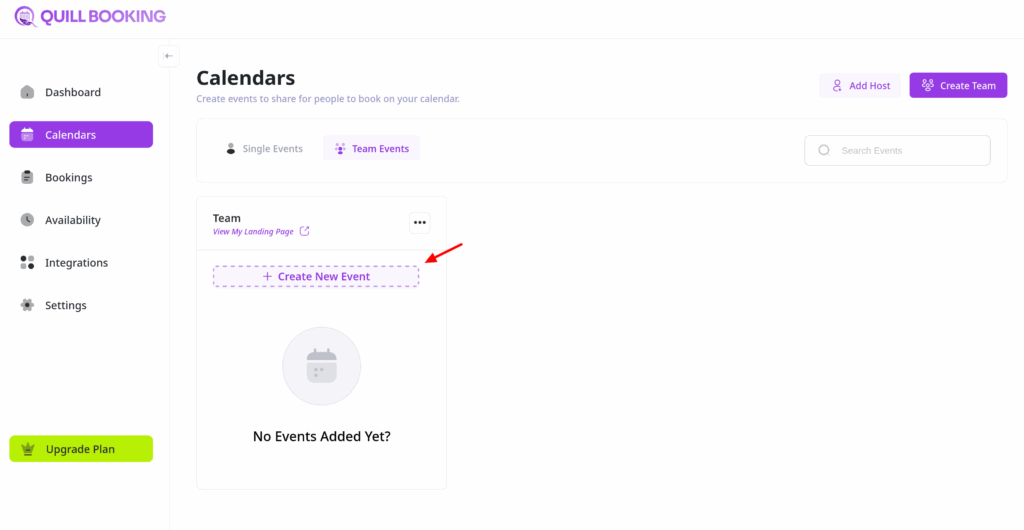
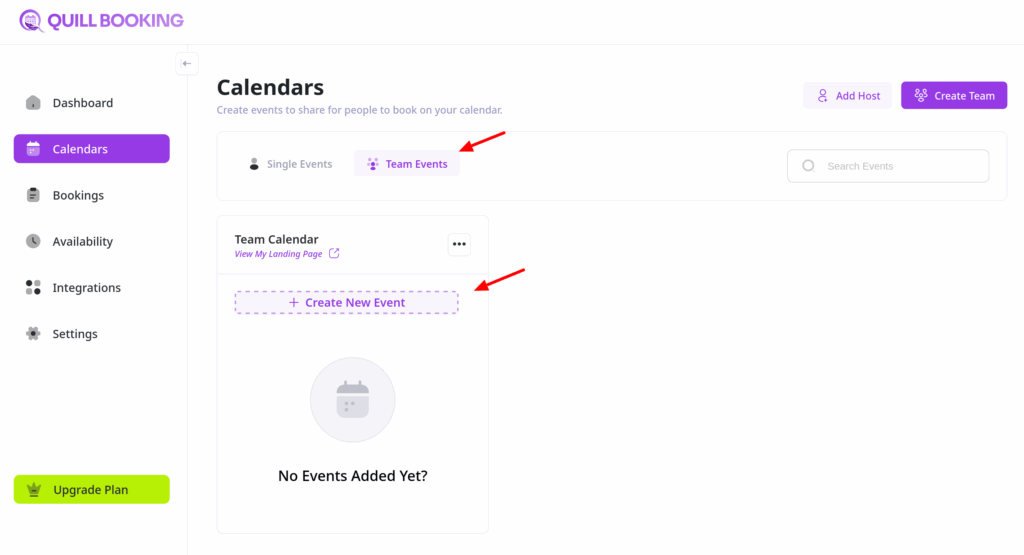
Step 3: Set Up Collective Event
Click on Create New Event button.
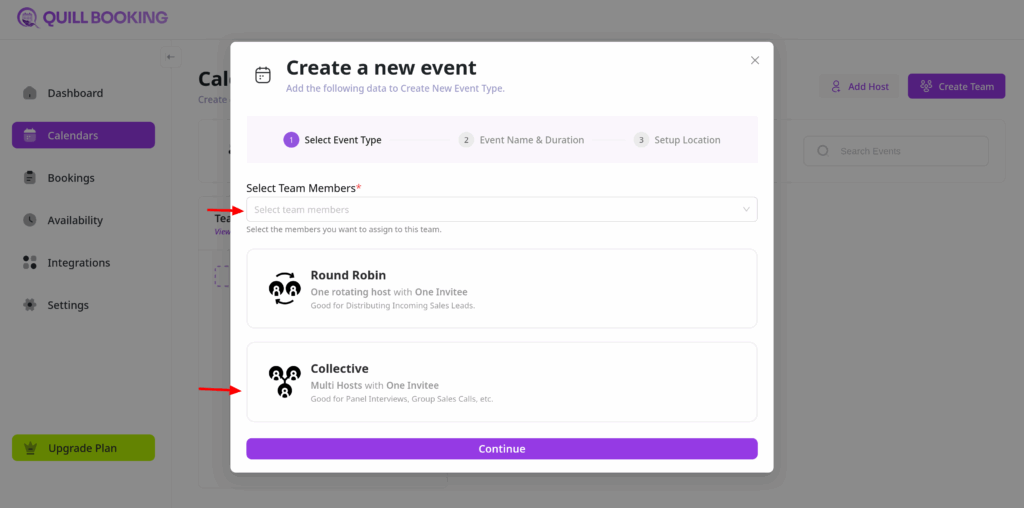
Choose the team members for this event, set the event type to Collective, and complete the remaining configuration settings.
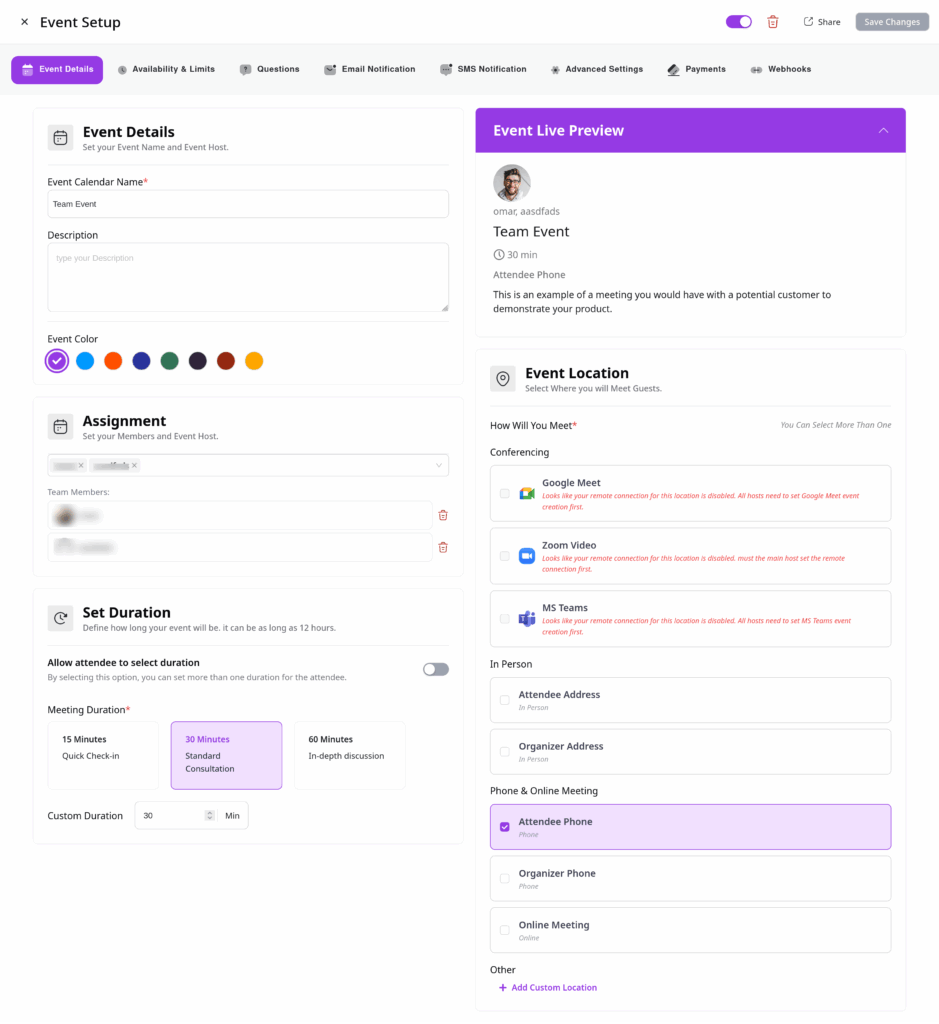
Once you’ve configured your event, you’ll be redirected to the Event Details page.
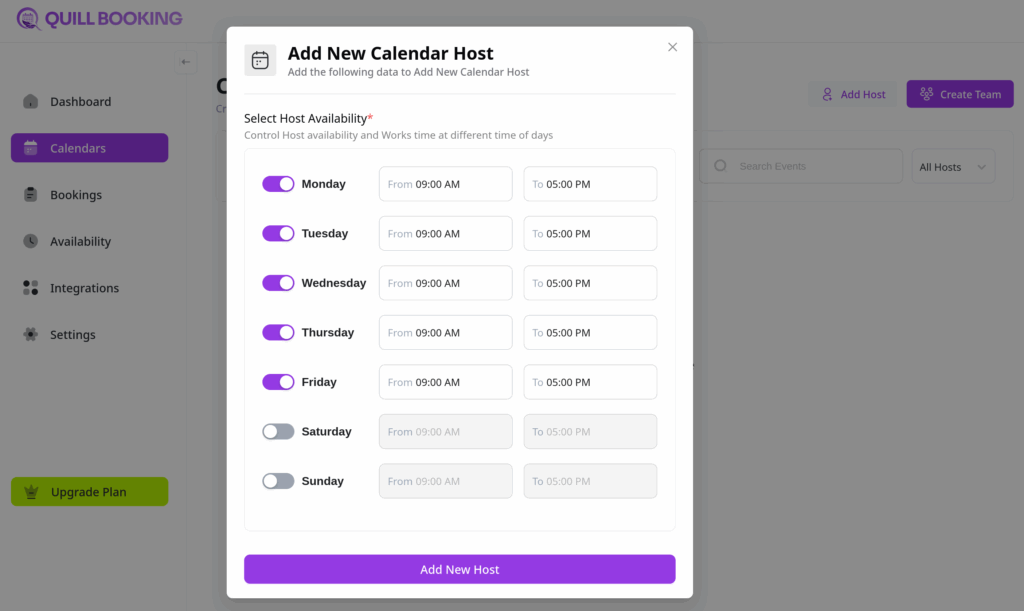
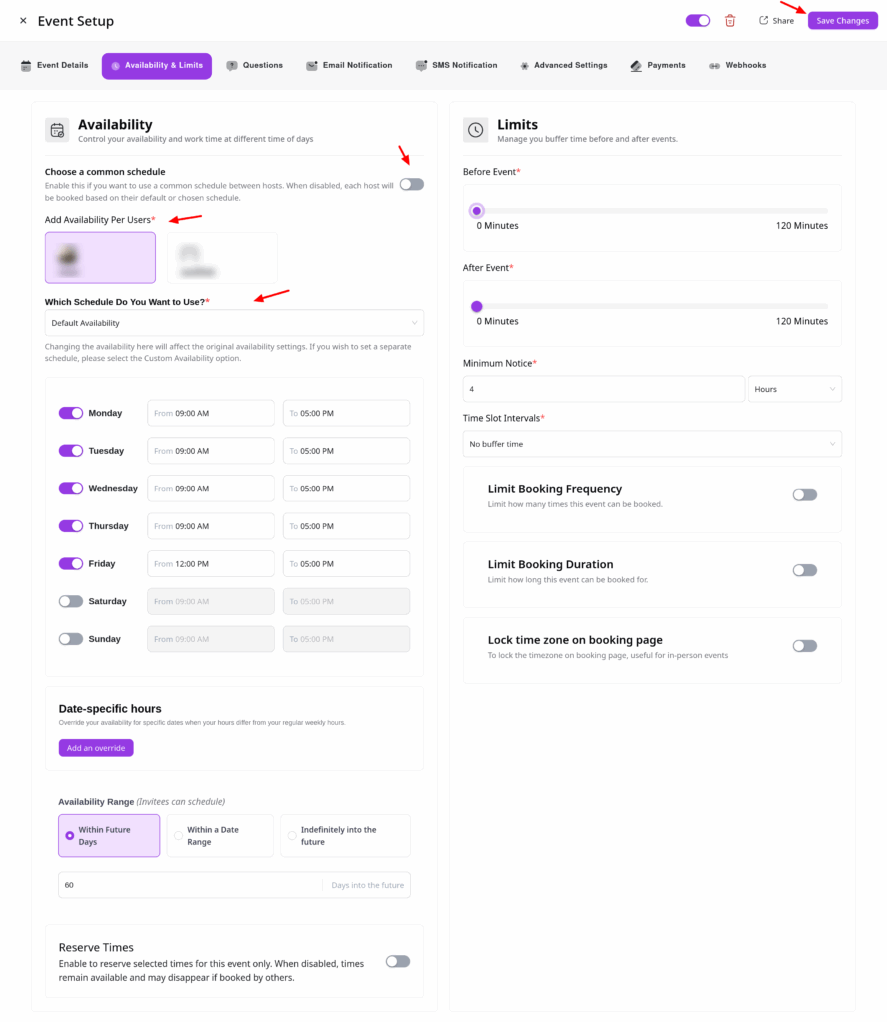
Step 4: Adjust Availability Settings
In the Availability & Limits tab, you can decide how your team’s availability is managed:
Common Schedule
Enable this option to use one shared schedule for all hosts.
If left disabled, each host follows their own schedule.
Host Schedule
If you prefer individual host availabilities, choose the Host Schedule option.
Select from each host’s pre-configured availability using the dropdown menu.
Once you’ve customized your availability, click Save Changes.
That’s it! You’ve successfully created a Collective Booking in QuillBooking.
If you have any questions, suggestions, or need assistance, feel free to contact our support team—we’re always here to help.
QuillBooking offers a powerful Round Robin feature that simplifies team scheduling by distributing bookings across multiple hosts. If one host is unavailable, QuillBooking will automatically assign the next available host—ensuring a seamless experience for your attendees.
This guide walks you through setting up Round Robin booking events step by step.
Before You Begin
Ensure you’ve already created at least one host in QuillBooking—teams must be linked to a host.
Create a New Team
Go to the Calendars section.
Click the “Create Team” button.
Team Configuration
A pop-up window will appear:
Enter a Team Name.
Select the Team Members you want to include.
Create a Round Robin Event
After creating the team, proceed to create your event:
Go to “Team Events” tab.
Click the “Create New Event” button.
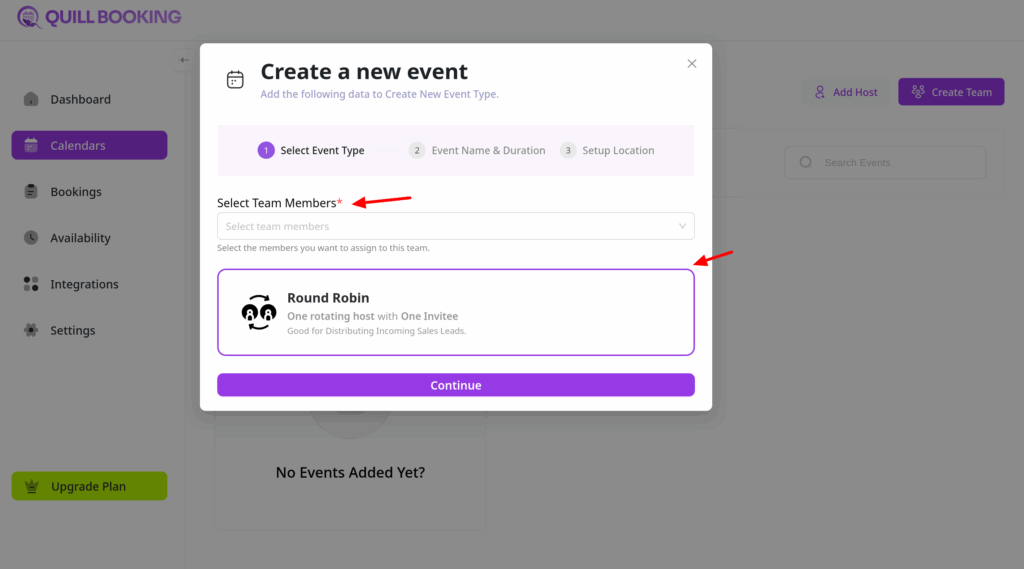
Enter Event Details
After creating the team, proceed to set up your event details:
Select Team members and click on Round Robin.
Input event name, description and duration, as you would with any booking event.
Click Continue to setup your locations. Ensure each team member has integrated their Zoom, Google Meet, or other meeting platforms for smooth scheduling.
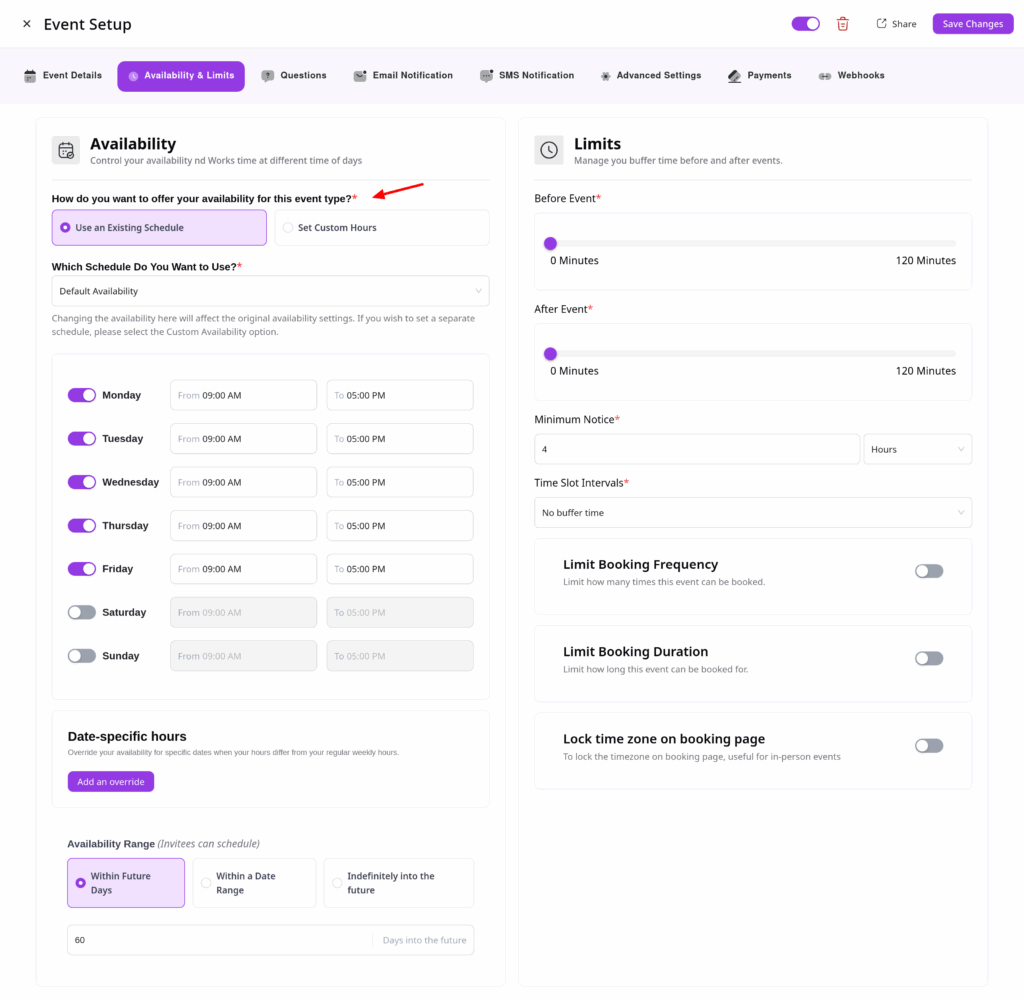
Availability Settings
You have two scheduling options for your team:
Use An Existing Schedule: Uses a host’s schedule.
Set Custom Hours: Set a new schedule for this event.
Host Assignment
Manage your Round Robin team members easily from the Assignment section in the Event Details tab.
Additional Settings
Round Robin booking events support all standard event settings, including:
Availability
Booking limits
Notifications (email/SMS)
Payment settings
Advanced options
To create more Round Robin events for the same team, go back to Calendars and click “Add New Event ”
Welcome to the guide for creating new booking events in QuillBooking. Follow these simple steps to set up a new event and start accepting bookings right away!
Before You Begin
Ensure you’ve already created at least one host in QuillBooking—events must be linked to a host.
Creating a New Event
From the QuillBooking navigation menu, go to the Calendars section.
Click the “Add New Event” button located in the middle of the screen.
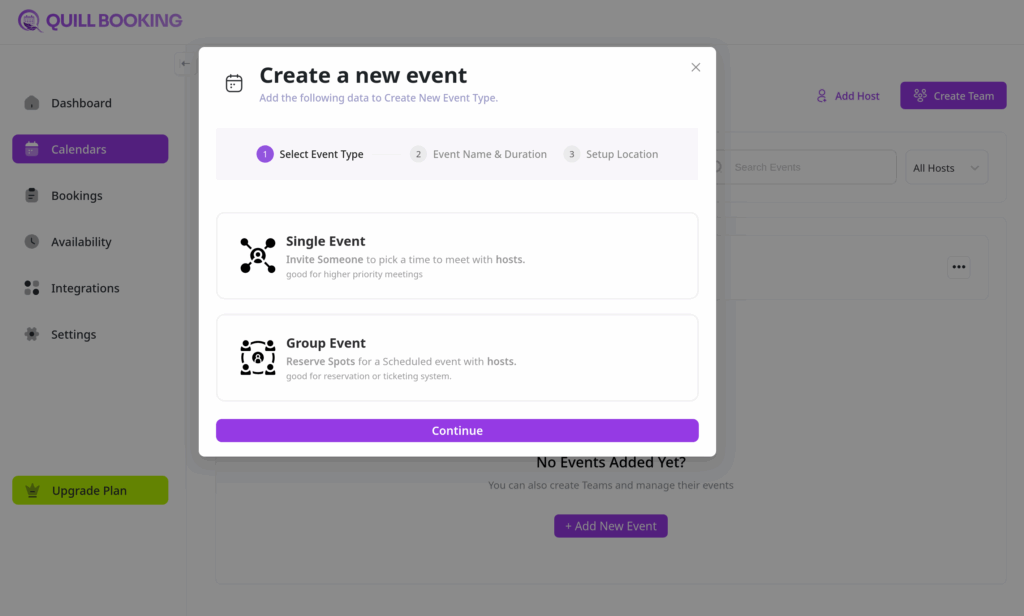
Choose Event Type
A pop-up window will appear asking you to choose your meeting format:
One-to-One Meeting
Group Meeting
Select the one that fits your event.
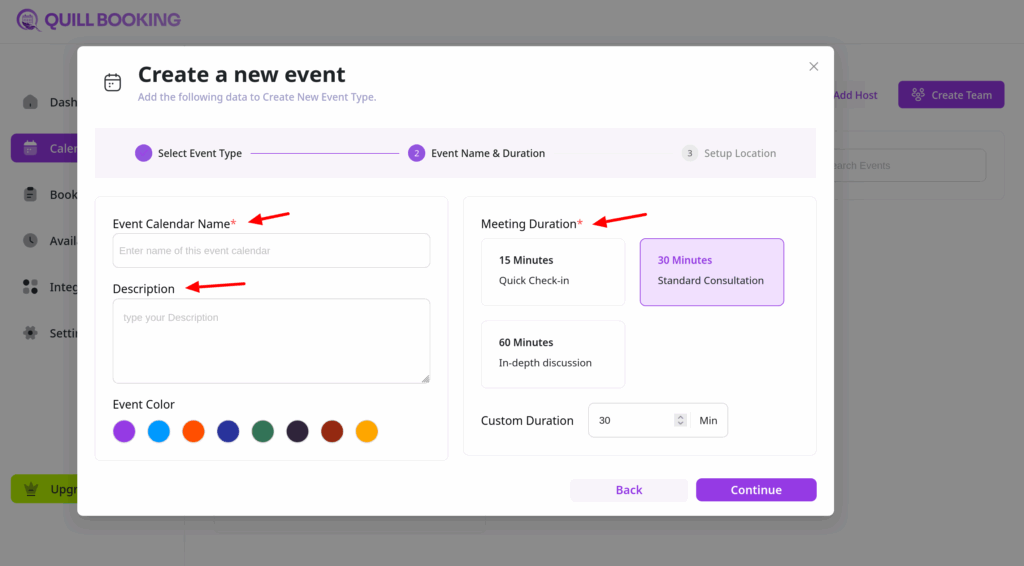
Enter Event Details
Next, provide the details of your booking event:
Event Name: This will appear on your public booking page.
Description: A short description to give attendees context.
Meeting Duration: Select how long the meeting will last.
Event Color: This will appear on your public booking page.
Click “Continue” when you’re done.
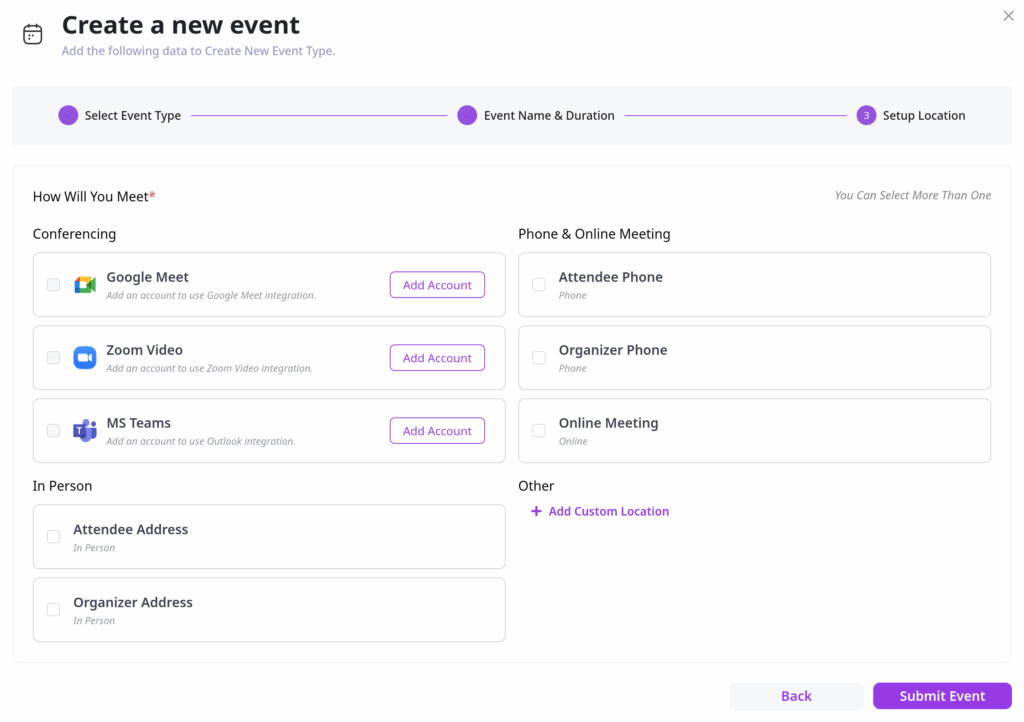
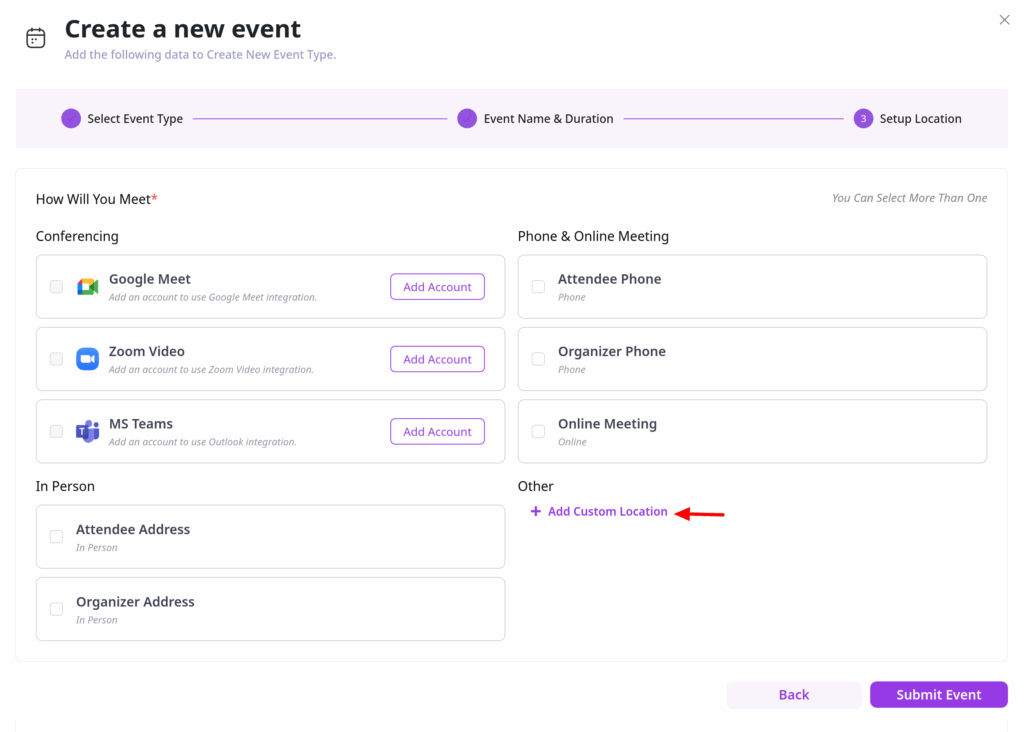
Configure Event Location
Choose the platform (e.g., Zoom, Google Meet, Phone Call). You can add multiple locations using “+ Add custom location”.
Configure Event Settings
In the next step, you’ll have access to the full settings panel, including:
Event Details
Availability
Booking Limits
Question Settings
Email Notifications
SMS Notifications
Advanced Settings
Payment Options
Webhooks
Customize these settings based on your preferences and workflow. Once finished, click “Save Changes”.
Need to make changes to a booking? With QuillBooking, editing, disabling, or deleting events is simple and fast. Here’s how to do it:
✏️ Edit a Booking
Go to the Calendars section form your QuillBooking navigation bar
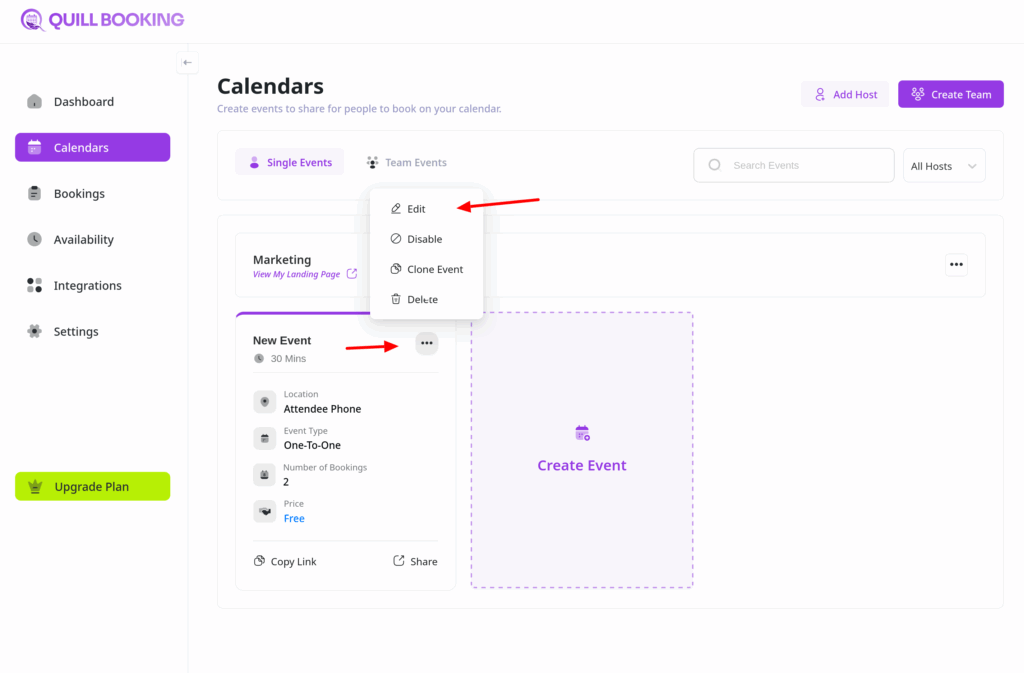
Find the booking event you want to modify and click the button with the three-dots.
From the dropdown menu, choose Edit, Disable, Clone, or Delete based on your needs.
If you select Edit, you’ll be taken to the Event Details page, where you can update the event’s name, description, duration, availability, notifications, and more.
Once you’re done editing, click Save Changes to apply your updates.
QuillBooking allows you to fine-tune how and when your events can be booked by setting up smart booking limits. These options help you manage breaks, scheduling intervals, and booking frequency to ensure a smooth experience for both hosts and attendees.
Event Limits
To set up limits for a booking event:
Open the Calendars section from your QuillBooking navigation bar.
Choose the specific event you want to configure and click the Edit button.
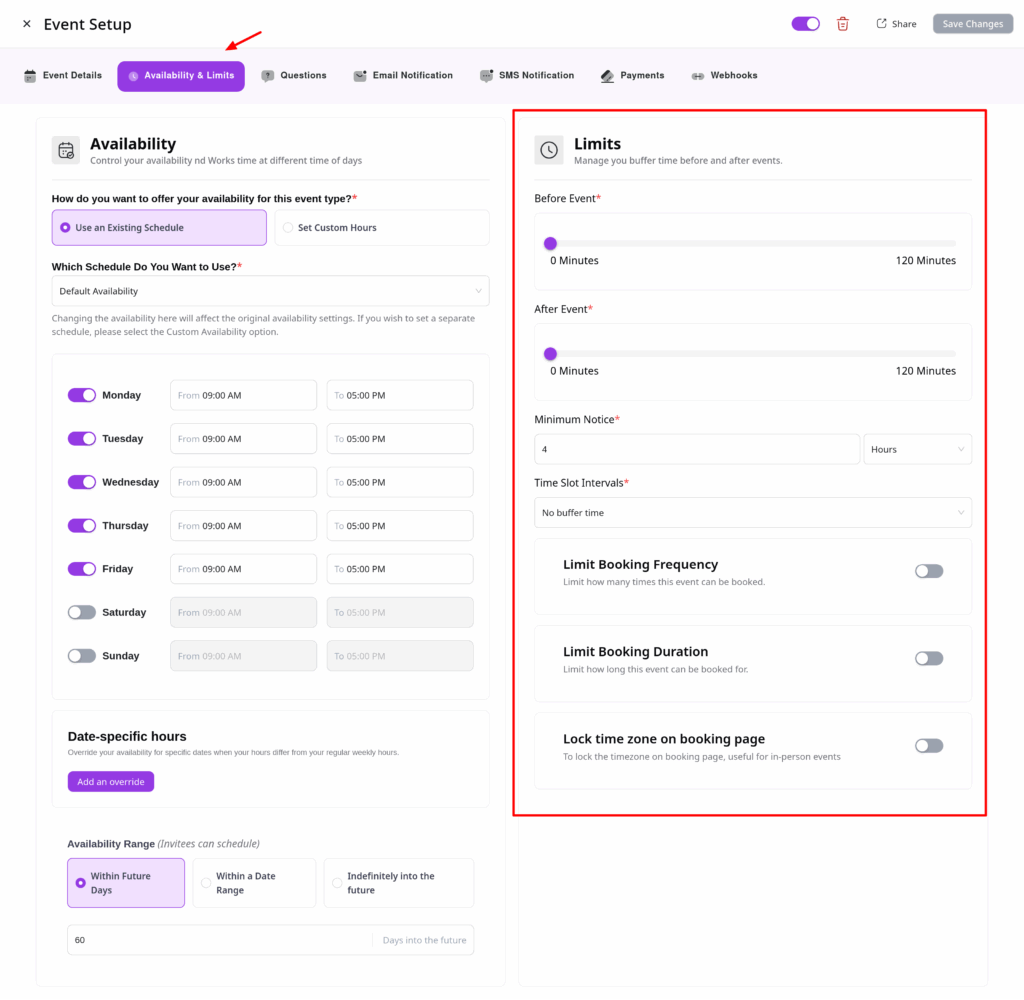
From the tabs, select the Availability& Limits tab.
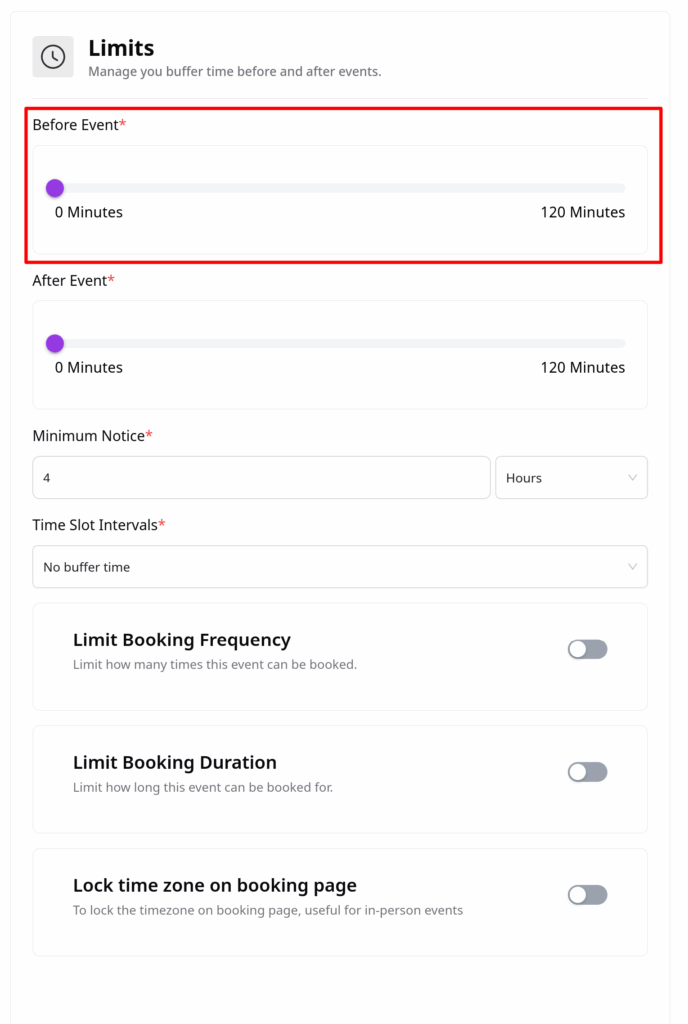
Before the Event
Set a buffer time before each meeting to prevent back-to-back bookings. Just enter your desired break duration in the pre-event buffer field.
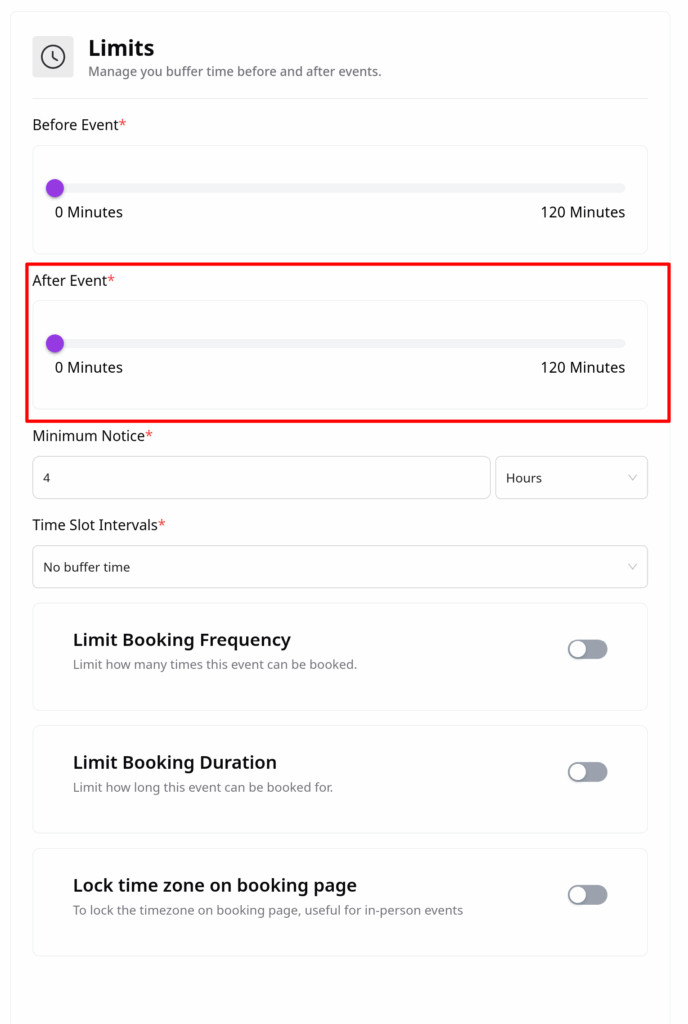
After the Event
You can also add a buffer time after each meeting to allow for breaks or wrap-ups before the next event begins.
Minimum Notice
Define how much advance notice is required before someone can book a meeting.
Example: If you set the notice period to 1 hour, no one can book a slot starting within the next hour.
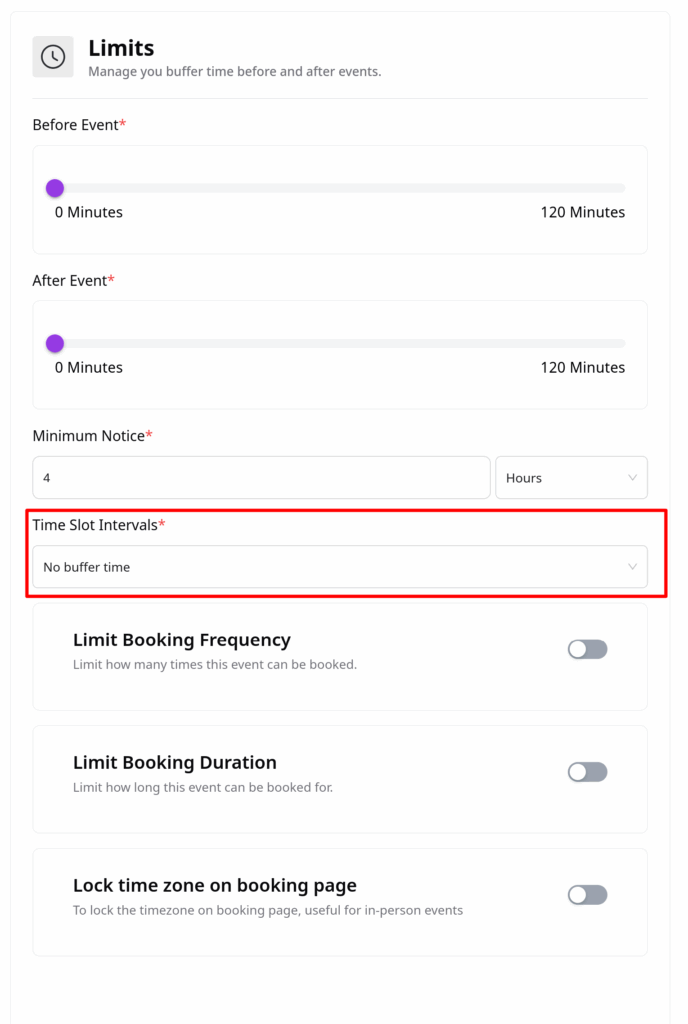
Time-slot Intervals
Customize how your available times are divided with time-slot intervals.
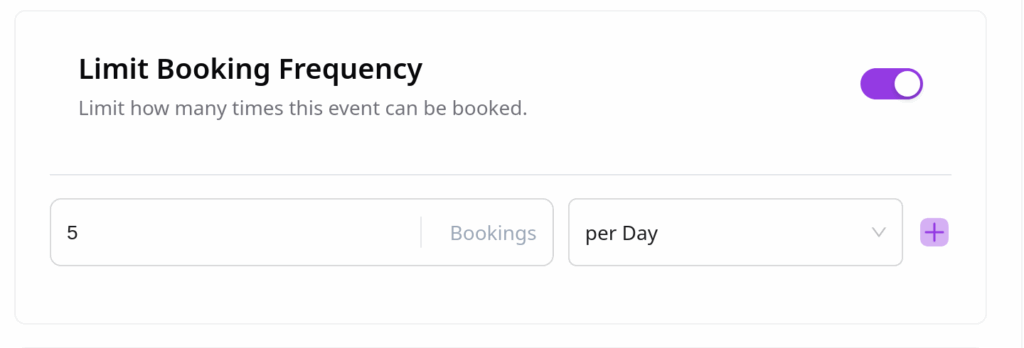
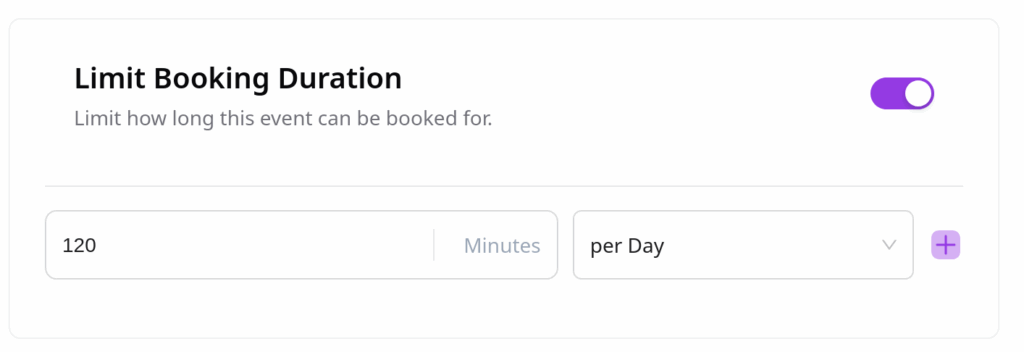
Set the maximum total duration a user can book across sessions—for example, limiting the total attendance time to 2 hours per week.
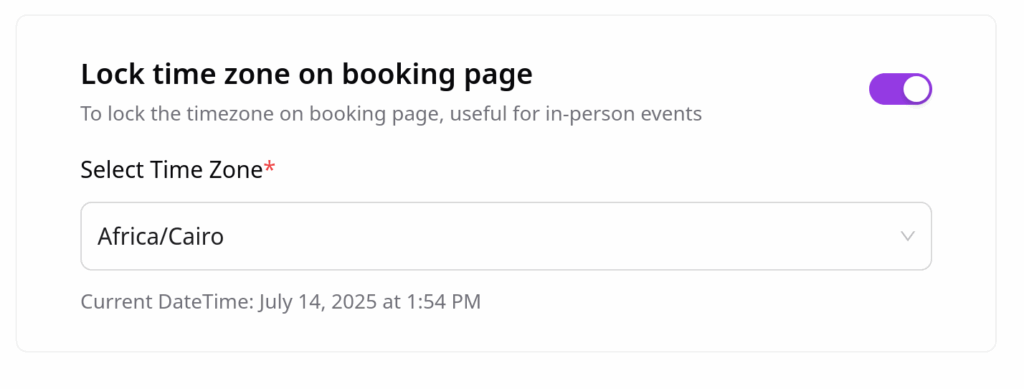
Lock Timezone on Booking Page
Prevent confusion by locking the timezone shown on the booking page:
Select a specific timezone from the dropdown.
Attendees will see the event times only in this timezone and won’t be able to change it.
This is especially useful for in-person events or region-specific sessions.
With these booking limits in QuillBooking, you gain full control over your availability and event flow—ensuring a better experience for both you and your attendees.
With QuillBooking, you can create custom questions to collect important information from your guests before a meeting. This guide walks you through how to set up and manage booking questions for each event.
Manage Booking Questions
To configure booking questions:
Go to your QuillBooking navigation bar and click on Calendars.
Select the booking event you want to customize and click Edit.
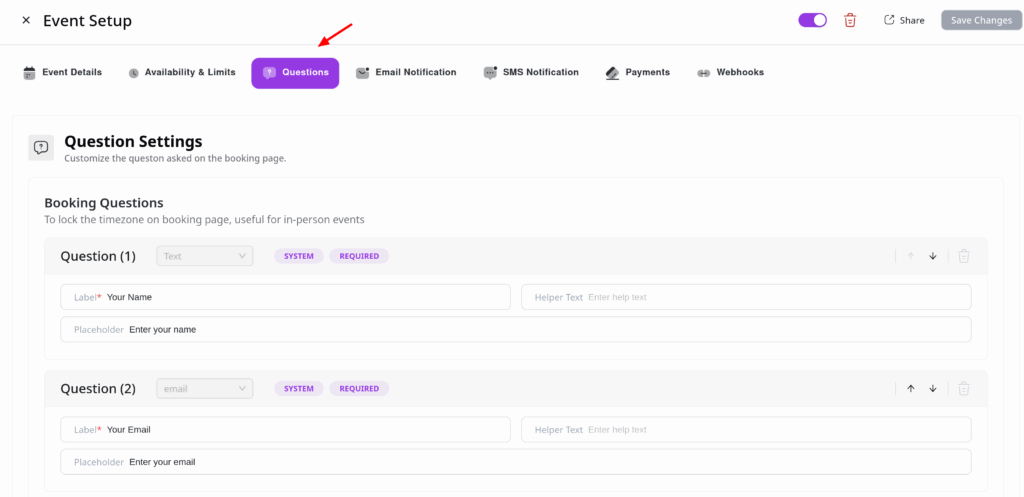
In tabs, select the Questions tab.
You’ll see some default questions already in place, such as Name and Email—these are required and cannot be removed.
You can:
✅ Edit a question
🗑️ Delete a question – Click the Delete icon to remove unnecessary questions.
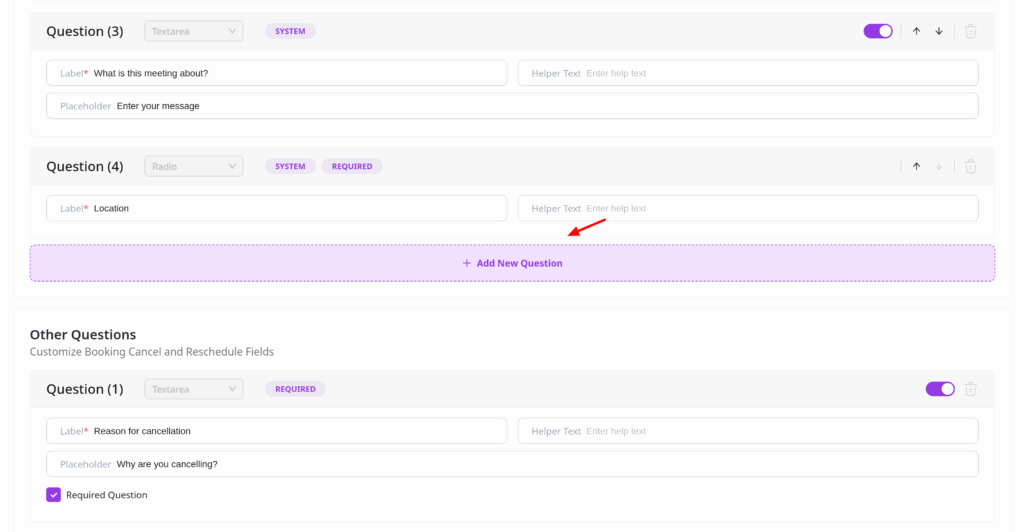
To add a new question, click the “Add more questions for the invitees” button.
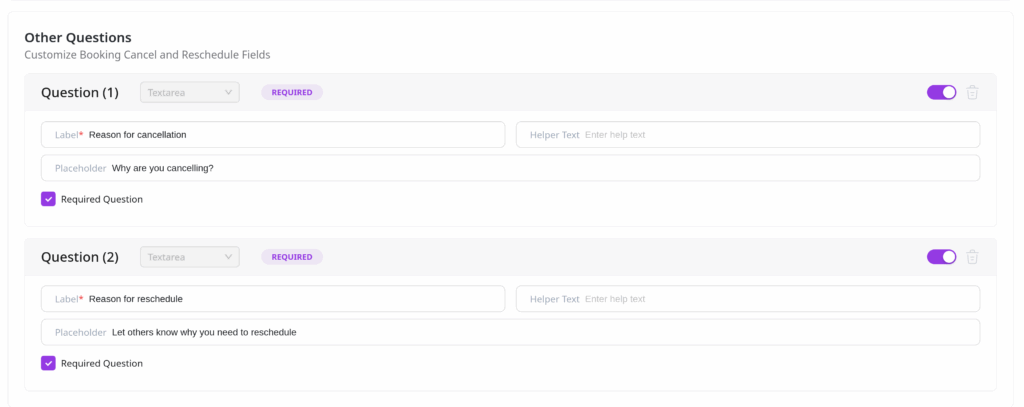
Manage Cancellation & Reschedule Questions
You can also create specific questions to ask attendees why they are canceling or rescheduling a booking—great for gathering feedback and improving your service.
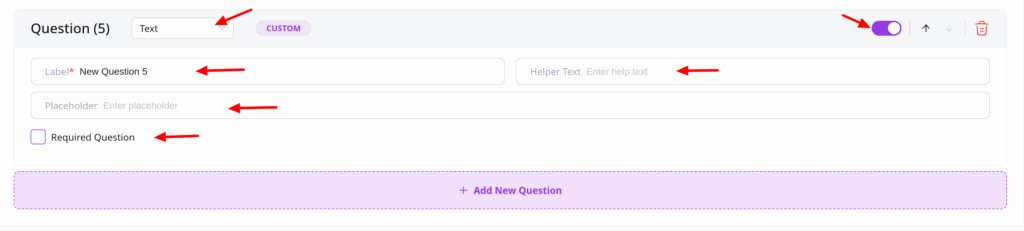
When adding a question, a new field will appear where you can configure:
Field Type – Choose from: Text, Textarea, Email, Phone, Number, or Dropdown.
Label – The question or prompt shown to the user.
Placeholder – Optional hint text inside the input field.
Required – Toggle whether the question must be answered.
Appearance – Toggle whether this question should appear on the form. Disabling this will hide the question without deleting it—useful for temporary changes.
Final Step
Once you’ve added or edited your questions, click Save Changes to apply them.
Your booking form is now tailored to collect the exact information you need—giving you more control and better insights from every guest.
QuillBooking lets you send automated email notifications for actions such as booking confirmations, reminders, reschedules, and cancellations—keeping both you and your attendees in the loop.
This guide will show you how to configure email notifications for individual booking events.
How to Set Up Email Notifications
From your QuillBooking navigation bar, click on Calendars in the top navigation bar.
Find the booking event you want to update.
Click the Edit button next to the event.
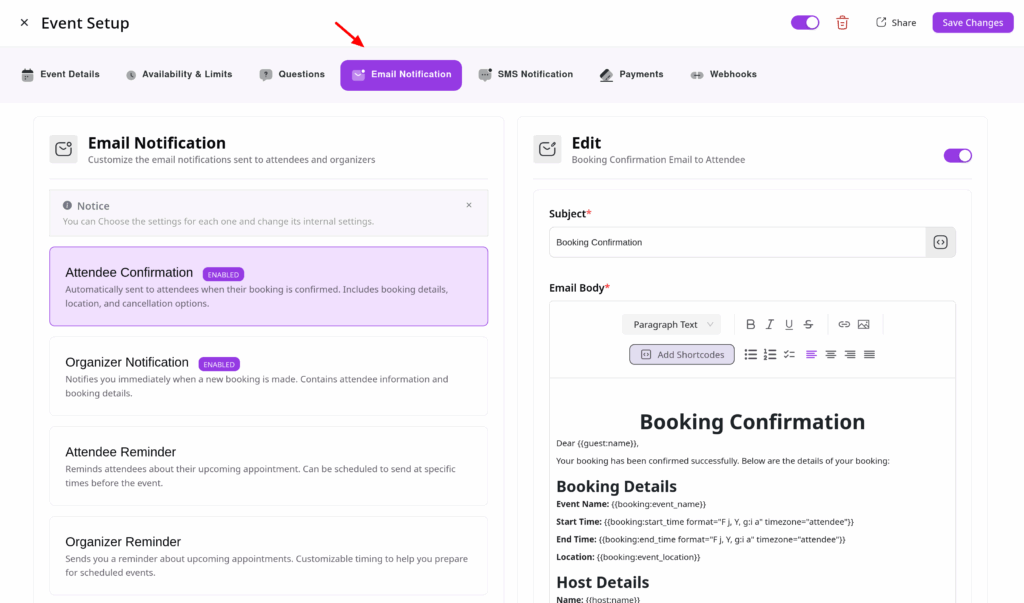
From the tabs, go to the Email Notifications tab.
Here, you’ll find default templates for both Organizer and Attendee notifications. Toggle any notification on or off based on your preferences.
Customize Notification Settings
To personalize your email notifications in QuillBooking:
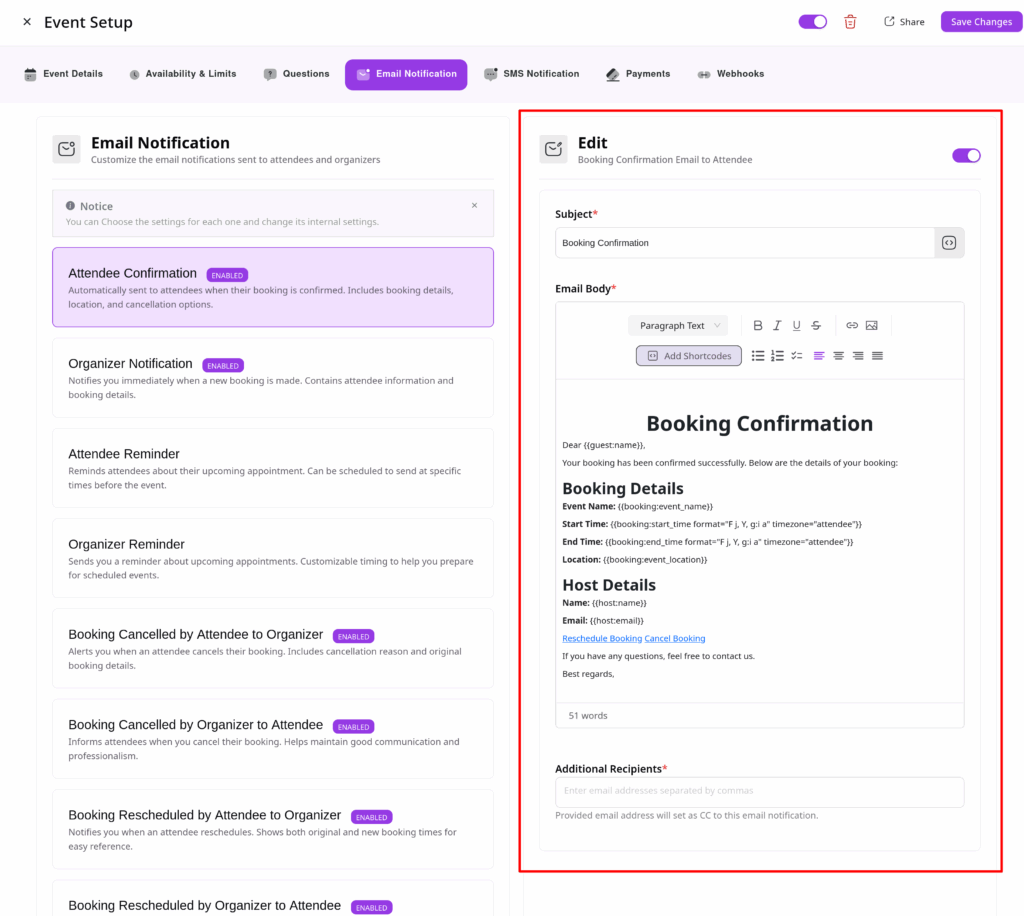
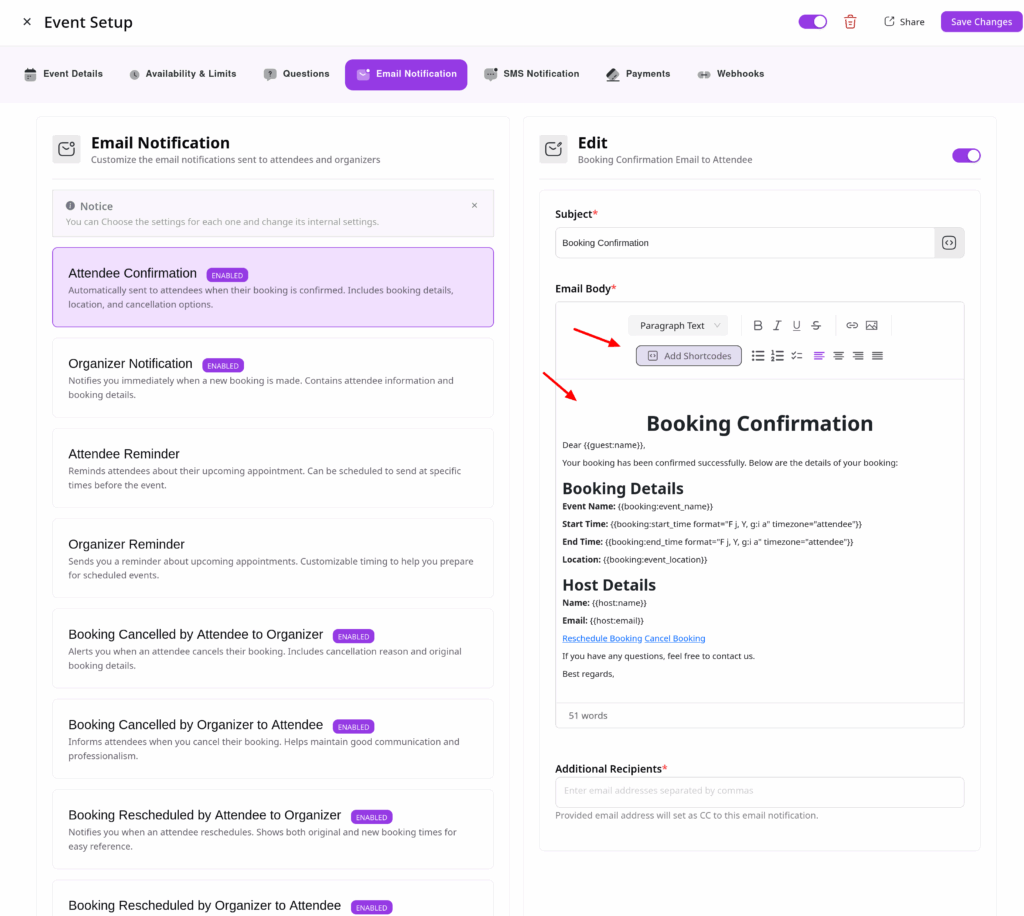
Click on the email template you want to edit.
The content will appear in the editing panel on the right.
A. Subject
Enter a custom subject line for your email.
Use shortcodes to automatically include booking details like event name, time, or guest info.
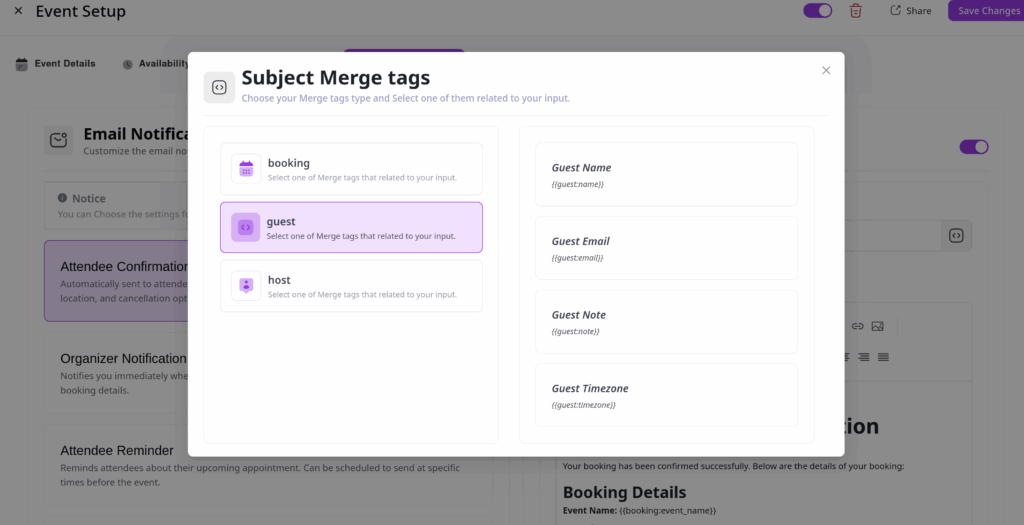
Click the Angle Brackets ( <> ) icon to browse available shortcodes.
Available shortcode categories:
Booking Data – Event name, time, location, description, etc.
Guest Data – Attendee’s name, email, timezone, notes.
Host Data – Host’s name, email, timezone.
B. Email Body
Write your message in the email body field.
Use shortcodes to dynamically personalize the content based on the booking information.
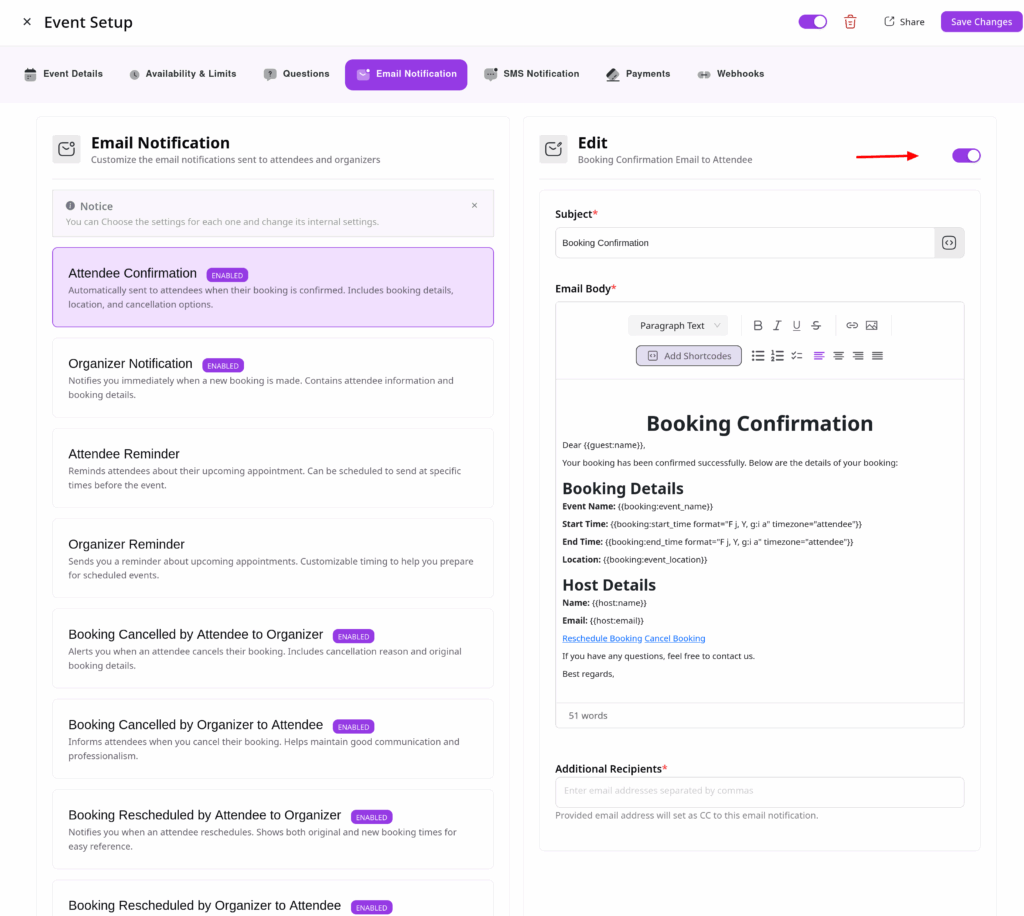
C. Status
Toggle the Status switch to enable or disable the email notification
Manage Consent
To provide the best experiences, we use technologies like cookies to store and/or access device information. Consenting to these technologies will allow us to process data such as browsing behavior or unique IDs on this site. Not consenting or withdrawing consent, may adversely affect certain features and functions.
Functional
Always active
The technical storage or access is strictly necessary for the legitimate purpose of enabling the use of a specific service explicitly requested by the subscriber or user, or for the sole purpose of carrying out the transmission of a communication over an electronic communications network.
Preferences
The technical storage or access is necessary for the legitimate purpose of storing preferences that are not requested by the subscriber or user.
Statistics
The technical storage or access that is used exclusively for statistical purposes.The technical storage or access that is used exclusively for anonymous statistical purposes. Without a subpoena, voluntary compliance on the part of your Internet Service Provider, or additional records from a third party, information stored or retrieved for this purpose alone cannot usually be used to identify you.
Marketing
The technical storage or access is required to create user profiles to send advertising, or to track the user on a website or across several websites for similar marketing purposes.